
 RSS
RSS
I'm making some glowy pinball
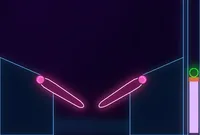
So, I’m making a pinball video game. And I’m making it glowy: what’s sometimes called a “neo-retro” or “synthwave” 🌈 aesthetic.
There’s more to this pinball than just these aesthetics, but that will be revealed down the road. For now, sharing my first efforts at achieving the looks feels like a good place to start.
In this first post I’ll cover:
- Links to playable dev preview & motivations for sharing early
- A dev recap of my work so far with the aesthetics
Early access to the game
And I mean really early! I want to get better at sharing work sooner. As a solo developer, showing progress as it happens allows for moments to break away from what can sometimes feel an isolated 😞 process.
Also, being pretty new to game development and the Godot Game Engine, write-ups like this are opportunities for self-reflection.
In that spirit, I’m sharing playable builds from the very start:
- Playable web version 🎮 (itch.io)
- Desktop versions (Windows, MacOS, Linux) 💻 (itch.io)
- The desktop versions generally have better graphics since they run more capable renderers
- They are unsigned at this stage, so you might see a warning from your anti-virus or similar
Give it a quick try! Note: this is a first “developer build” (think version 0.1). There isn’t a game there yet, but you can check out the basic flipper physics and a first pass at the aesthetics.
Any feedback appreciated!
What goes into the synthwave look?
Bear in mind that I’m just starting out here. Still, I can go over what my first areas of focus were, which works out well because they in fact represent the fundamentals or “building blocks” of the aesthetic.
- Achieving “glow”
- Vector-graphics style: Curved 2D polygons with bold outlines
- A trail effect for the ball
Glow
Well, since it is “glowy pinball”, making things glow was the biggest first step. Godot provides a pretty comprehensive WorldEnvironment with a dedicated Glow section that helps with this, though it takes some fiddling and tuning to get the result you want.
Glow isn’t applied to individual items, it is a global effect. But it will only affect items whose brightness surpasses a configured threshold: so you raise the luminosity of items you want to glow by the degree you want past said threshold, and only those items will glow. There are numerous other modifiers and tweaks, but this is the gist of it.
The following tutorials helped me understand it all better:
- 2D Glow in Godot 4.5 ▶️
- Godot 3.5: How To Easily Add Glow to 2D Games ▶️: Using Godot 3.5, but provides some additional explanation of the glow settings.
Glow II: Revenge of the Web (Build)
After a ton of tuning, tweaking, and otherwise finagling, I was finally pretty happy with how the game glowed.
Only to find out those precious settings wouldn’t work for the web build! Why? WHY!
Because Godot web builds run a different (OpenGL based) renderer and the brightness/glow implementation is not 1:1 with the renderer for desktops. To be fair, there were warnings in the documentation—I had just chosen not worry about it till I got around to exporting for web.
The upshot was that I had to:
- Do a second set of glow tuning for the web build
- Devise a solution to apply those settings only when running the web build
The first is self-explanatory. For the second, there were a few options, such as using separate WorldEnvironments. However, I opted for a simpler, convention-based approach for now, where essentially these changes are made in a function called adjust_for_renderer() for each concerned item, and invoked at the start of the item’s _ready() function.
Vector-graphics style: Curved 2D polygons with bold outlines
Another design direction, following after the stylings of classic games like Asteroids Deluxe and the newer Geometry Wars, was that the game elements would be composed from simplified 2D polygons, often curvaceous, with dark masses and bright, bold outlines (that glow of course!).
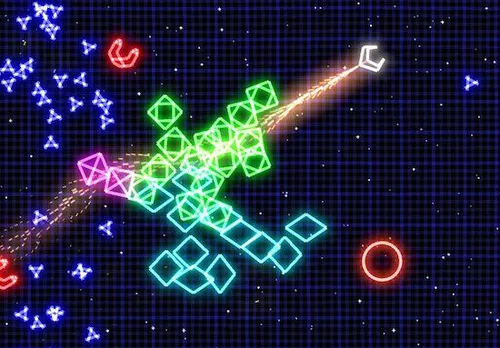
The outlined 2D shapes of Geometry Wars
For this kind of look, using regular raster graphics for sprites isn’t a great fit. The line quality would be subject to the scaling of the image (for different sized sprites), plus it would be onerous to constantly recreate textures for board elements (surfaces, game objects) whenever their shapes/designs change during development (when you’re designing a pinball board, you are constantly tweaking the board design).
The solution I landed on (guided by this tutorial: How to make 2D Curved Terrain in Godot 4 ▶️), was to create game elements from Path2D instances. Path2D in Godot provides pretty flexible manipulation, allowing for the design of shapes much like in vector graphics apps (e.g. Adoble Illustrator/Inkscape).
Then I created some utility classes to generate polygons, lines, and collision shapes from the Path2D paths, basically mimicking the solids you get in vector graphics. So each game object is comprised of an outline and internal shape, which can be styled separately.
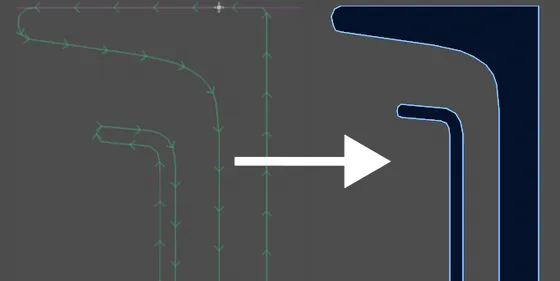
Path2D conversions to Polygon2D & Line2D for the pinball table entry pathway
There are some limitations when working with Path2D in Godot, mainly around ease of use in the Editor, but for now I think it’s serving me pretty well. If I need something more advanced in the future, the Scalable Vector Shapes 2D plugin for Godot looks quite promising.
Trail effect
When I played Joust on the Atari 2600 🕹️ as a child, a side-effect of the CRT television’s intrinsic phospor decay was that, if you adjusted the brightness/contrast just right, the birds looked like they were leaving glowing trails as they moved about.
It’s hard to find examples today, but this video sort of shows what I’m talking about
The effect is such an prevalent memory from my childhood that I really wanted to recreate it now that I’m making a game involving related aesthetics.
My first pass resulted in a simple line-based trail effect that matched the ball’s color. However, since the ball’s texture may change in the future, and I wanted the trail to reflect the texture, I ended up using a shader for the trail that repeats the texture and applies some motion blur.
Short capture of the game so far, demonstrating trail and glow effects
One issue was that the trail began overlapping the ball as it bounced to a stop in enclosed areas (like the launcher area). Because the ball was still moving, it was still drawing the trail within the small, contained space, thus the overlap.
The fix I came up with was to only draw the trail if the ball was past a specified “trail velocity”. If the ball is below that velocity, all points in the trail line are cleared.
The fix works quite well. When the ball is bouncing to settle to a rest in the launcher area, it’s velocity drops below the threshold, and the trail line is cleared.
Thanks for reading!
Phew, that was longer than I had expected! Mainly because a lot had already happened with the game in the course of getting this blog set up. Anyway, now that this is in place I hope to post more frequently, so future posts will probably be more concise and less wide-ranging.
I have several other things I’m working on, aside from this pinball project. I’m excited to finally share them all here in days coming!
If you have any thoughts or feedback, please reach out via my socials.